Wednesday, 30 November 2011

Signage...

I've been trying out some ideas with the Staters 8mm black plasticard letters.

First up is a generic Austrian inspired station name board, with the station named 'Alisendorf', a twist on Mum's name. I'm pretty happy with it, it's edged with satin black paint applied with a bow pen.

The second thing is the signal board type signs. I made one up earlier in the week more closely to scale but it didn't look right next to the chunky track so I've mocked up a second using a BBQ skewer rather than cocktail stick and a slightly bigger back board. I think it's a good compromise. What do you think?

Sunday, 27 November 2011

Rugens outside...

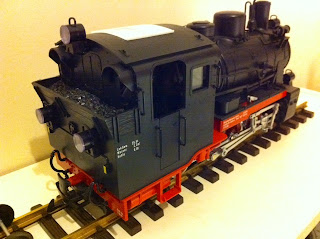
I've dropped the Rugens back off at the EJ&KLR this afternoon, so took a few photos. The works plates will probably be a few weeks, and when I fit them I'll also add some coal to the bunker.

I've collected the grey flat wagon as I want to size up some loads and I will be starting on the roll-wagen bogies soon.

Thursday, 24 November 2011

Where's the works plate?

Bruce inspects the Rugens new identity but it appears he's misplaced the works plates... Good job I've ordered a new set from Steve at Narrow Planet (www.narrowplanet.co.uk).

Wednesday, 23 November 2011

Ready for transfers...

Progress has slowed with both my wife and daughter poorly this week, but I've sprayed some gloss varnish in the locations I'll be applying transfers tomorrow, with luck... Then 599.01 will be ready for her new life on the EJ&KLR.

Monday, 21 November 2011

Little and large...

As work progresses on the Rugens I have brought the diesel shunter back for a few tweaks to the finish. I have painted the handrail and buffers black and the outside balance weights red. So apart from the Shay this is the EJ&KLRs smallest and biggest locomotives.

Friday, 18 November 2011

Frank S conversion in print...

My article penned especially for Continental Modeller earlier this year has appeared in the December 2011 issue of the magazine (http://www.pecopublications.co.uk/continental-modeller). It's 12 months since I last appeared in print, in the Traction Annual last year and in Model Rail 12 months before that. It's lovely to be able to share this niche part of our hobby with a wider audience, I hope my model encourages others to have a go...

Wednesday, 16 November 2011

Skip the primer...

On reflection, I figured I could skip the primer so long as I built up the finish in thin multiple costs on the Rugens. Therefore tonight, after fitting the rivets to the front of the roof hatch, I applied Humbrol satin black thinned a little more than usual with my airbrush.

Tuesday, 15 November 2011

Rugens progress...

I've been a little bit of work on the LGB Rugens tonight, replacing the moulded lift rings on the cab roof, filling the holes from the large original front number plate, fabricating a replacement just big enough for my new number, and also adding a handle to the smoke box door. I finished by adding some varnish to the roof hatch so I can some resin waterslide transfer rivets tomorrow evening before priming the cab roof.

Monday, 14 November 2011

Roof work on the Rugens...

I've been pondering what to do with the Rugens roof, so tonight I fitted a fake sliding hatch to hide the four holes from the old clip on roof. I'll add a couple of rivets to the hatch bit on the front edge to suggest there is a handle fitted on the inside. I've also removed the number and markings from the cab.

Sunday, 13 November 2011

Roll-wagen wheelsets arrive...

Thanks to Mike (dutchelm), the man who sold me the 2095 diesel earlier in the year, two pairs of LGB feldbahn wheelsets arrived in the post this weekend... Seen here with the Rugens that has returned to Macclesfield for light detailing and a patch repaint and numbering.

Saturday, 12 November 2011

Rugens and vans, good photos...

From Rugens visits EJ&KLR

I had a fun afternoon, keeping things simple, really only running two trains - a freight with the Rugens and the railcar on passenger duty. However since the railcar has no isolation switch, and the Rugens switch doesn't seem to have any effect I couldn't leave both on the track at the same time. Click the thumbnail below for the full album.

Rugens visits EJ&KLR

Rugens and vans first run...

After clearing leaves, cleaning track and a 'warm up' few laps with the railcar the new Rugens and repainted vans took to the line. One thing I notice with the digital chipped models is how slow they run on the starter set controller!! Smooth but no movement until you get to 3 out of 4. It's the same with my factory chipped U-tank.

I've taken some more photos with the other camera which I'll upload later.

Wednesday, 9 November 2011

Roll-wagen first drawings...

From drawings and dimensions in the book Schmalspurig durch Osterreich, along with some guestimations from existing LGB stock I've started drawing up in Adobe Illustator to get a feel for the sizes involved with this project.

It's currently drawn up on the assumption that I'll use LGB Feldbahn 20mm diameter wheelsets and Plastruct 15.9mm section I beams for the main chassis.

The sketches also show that with an inside framed bogie it will negotiate R1 - as well as giving an impression of size with an LGB 'standard gauge' model wagon load, against a narrow gauge LGB van.


Tuesday, 8 November 2011

Roll-wagen project...

Well with the Rugens project 'on ice' and a long winter ahead of me I've got around to planning the next 'Austrian' inspired creation. This time I'm looking at building a roll-wagen - a wagon that's sole purpose is to transport a standard gauge wagon over narrow gauge rails. So in G scale, say 1:20/1:22, 45mm is about 3ft (rather than the 760mm in Austria), and standard gauge is about 64mm for the sake of argument.

That means constructing a low riding flat car, basically two beams with two small wheeled bogies within it. I intend to just use a standard LGB model on the roll-wagen, as I suspect that a full size scale standard gauge wagon, despite being accurate, would look a bit silly - but I can do that in the future. The good news is 64mm wheelsets will JUST fit inside the LGB axleboxes without fouling - and as this standard gauge wagon won't need to move that's perfect.

The first photo shows a set of roll-wagens on the right - and a steel-bodied re-built brake van on the left (this van will be my next LGB bash - but that's a more involved job as I need to source a 2 axle standard chassis, an Austrian outline bogie coach roof and some glazing units from the steel bodied DR style bogie combine). The picture, I believe, is taken on the Waldviertalbahn in the north east of Austria - a line that made substantial use of the roll-wagen throughout it's OBB history. The StLB and Zillertalbahn still use them heavily today as well.

Below that is the beginning of sketched notes as I develop my plans for how to construct something 'workable' for the garden. I've started a thread about it on G-scale Central here... http://www.gscalecentral.co.uk/f/m176004.aspx


Monday, 7 November 2011

Vans are finished...

The pair of LGB Deutsche Reichsbahn vans are finally 'finished'... I say finished, they're varnished. The last step is to pick out the door latch in black later this week.

I'm back at the EJ&KLR this weekend so am looking forward to giving them a run with the Rugens, weather permitting!

Sunday, 6 November 2011

Holding position?

With the quandary over the LGB Rugen bash still not straight in my head I've made the difficult decision to leave her largely as built. I'll add some real coal, new roof vent and some finer details, and for now suffice with a touch up of the black livery and new markings.

Friday, 4 November 2011

Rugens tank quandary...

I've started on a tank in plasticard tonight and come across a problem. If I don't remove the front of the well tank and keep the new tank construction around it then it overlaps the front cylinder mono block assembly. Grrr. Anyone have any thoughts? I'm going to mull it over...

Thursday, 3 November 2011

Deja vu

I've applied the transfers to the vans so I'm back where I was a week ago now! Just waiting for the Humbrol order to arrive so I can varnish it.

Wednesday, 2 November 2011

Another delivery...

This time from Slaters Plasticard, my 60thou sheets for the Rugens and some 8mm high letters...

The letters are for two things... Signs and a station name.

I also applied gloss varnish to the vans where I'll be applying transfers. This was done with a brush using Humbrol 35.

Tuesday, 1 November 2011

Fourth coat as transfer arrive...

Excellent service as per usual from Jon at Precision Labels (www.precisionlabels.com) and my new transfers arrived today. I chose to add a fourth coat of brown to fully cover the dodgy varnish, so we're ready for gloss varnish tomorrow, transfers then to follow.