Sunday 27 February 2011

Planning meeting...

Well here we are, planning and scheming this afternoon, snapped by my
little brother... and thanks to friends on G-scale Central I'm now
going to use R3 points for the loop, just keeping an R1 on the
entrance to the shed for space reasons.

Out into the garden... Part 2

Upon dismantling of the indoor layout today I took the chance to 'test' some track outside.

This is about the size of the station and length of the long side closest to the house. The train is parked where the loop will be located.

I have to admit great excitement even though I was just looking at a stationary train on track just plonked on the existing patio!

Saturday 26 February 2011

So what next?

Well today has been fun but has taught me a few things about the track plan, and the proposed outdoor layout. It's proven that the loop definitely needs to be at least 300mm longer, the siding needs to be 300mm longer and the curves need to be as gentle as possible.

I've also found some roofing felt in the shed, which will be perfect for covering the roof on the engine shed :)

Bags of atmosphere in black and white...

Here are a few photos from today's running session, done in black and white. Despite the LGB'isms in the loco and stock there is a real character to this model and coaches. I've really enjoyed playing with it today, and can't wait to get more track and start to try running in the great outdoors.


Permanent Way gang happy!

You can see why! The debut run of the new permanent way train, repainted diesel, new flat wagon (also repainted). It looks great and the subtle mods to the diesel have gone some way to giving it a more European appearance, certainly some angles start to look like a Kof. 

I do like this loco, it runs so well for a cheap (about £110) 0-4-0, and anyone getting into this scale couldn't go far wrong with one of the Bachmann sets using the American version of the loco and either logging or mining hopper cars, a circle of track and controller.


Day 1 - work started on clearing...

It may not look like much but this afternoon Elly and I (with a bit of help from Mum too) started clearing some of the conifers from the patio, location of the proposed EJ&KLR. This was an hours work between showers... more tomorrow!


Friday 25 February 2011

Wagons finished and outdoor photos...

I got the transfers and varnish applied to the two open wagons last night, Elly is pleased with hers and mine will be a welcome addition to the PW train.

I also took the opportunity to take some outdoor photos of the engine shed, what do you think? I'm pleased with how it's coming along nicely!

Wednesday 23 February 2011

Open sesame...

Well progress on the shed has slowed now the wagons and the track planning have started in earnest, however there is something new to share, the doors are painted and fitted (with Bostik All Purpose for now, possibly something stronger later). I'm really pleased with how they've turned out!

Thoughts have turned to how to incorporate some little interior details like a work bench, light and plug sockets etc. On the outside I've an idea on drainpipes but need to sort the roof before I do any more exterior detailing.

On a side note I've priced up the track for Version 10, with no discount and buying all new stuff and it's about £560 including the big LGB bridge. A lit less than I thought...

Tuesday 22 February 2011

Plan mock up (3D and photo merge)...

In addition to priming the new wagon I've also been tinkering on Photoshop to see what the layout looks like in it's proposed location...

Freight fleet grows...

I took delivery of a second hand LGB flat wagon today, liveried in Lehmann Oil grey, along with a fork lift truck and some oil barrels. Tat, but Elly will love to play with them and the new wagon and Elly's brown starter set wagon have entered the workshop to appear in EJ&KLR freight grey livery. With luck I can finish them before the next running session on Sunday.

Interestingly both the fork lift and new wagon are made in West Germany, so quite a vintage but in lovely condition. They look hardly touched, well until I primed the latter this evening!

Monday 21 February 2011

Version 10 as plans evolve...

In addition to being a lovely day out, with over 5 hours sat on a train together it gave Mum and I chance to discuss the garden railway plans. I shared my ideas and thoughts so far, however Mum started to reflect perhaps we should re-consider, and if we're doing this at all, do it properly, without compromises.

My little brother is keen to have a bridge somewhere in the scheme, and that coupled with inspiration by the H&MGR in New Zealand, along with a lifting of the cost constraint has sent the creative mind into overdrive. I was initially very worried about building in a gradient, and still am about the physical building, but in terms of planning, the Railmodeller software allows you to set a % and height gain and it calculates the height of each end piece of track. Perfect planning software...

Expect to see a few iterations of this scheme over the coming weeks!

Sunday 20 February 2011

Day out on the Welsh Highland...

Today was the day Dad and I were going to ride the Welsh Highland from Caernarfon through to Porthmadog. Mum and I have come instead and it's been lovely. We're sat in the Observation car eating lunch in the afternoon sun with two Garrets steaming outside!

More photos later...

Saturday 19 February 2011

A quiet relaxing afternoon with my sketchbook...

I spent an hour just drawing this afternoon, something I always find relaxing. I knocked this up from a photo in my Middleton Press book on the Austrian narrow gauge.

It's one if the 0-8-2 399 class engines, one of the most powerful designs on the Austrian narrow gauge lines, and shows a typical branch train in the early 1980s, yup that's right! 1980s!

Tuesday 15 February 2011

Transformed...

I popped into Halfords on the way home and picked up a rattle can of plastic primer. I've given the doors for the shed their first coat, and what a transformation!

Sunday 13 February 2011

Lock stock and three smoking barrels (bolts)...

I've had a chance to finish off three of the four shed doors today, with hinge, bolt and handle details.

The handle is 0.9mm and the bolts are 0.7mm brass wire, superglued into plasticard mounts. The hinges are plasticard microstrip, glued on with liquid poly which also dissolves the clear plastic too, making fixing the outer ones easier, I was imagining sticking my fingers together with superglue if it hadn't been!

Next up finish the second side door and then paint them! Plans are formulating for the interior, and the station building.

Saturday 12 February 2011

Open sesame, shed doors started...

Yup I've made the first cut...

Well quite a few actually, I've based these on the design of the shed doors of Garsten on the Steyrtalbahn.

They're made from outdoor polystyrene, with 60thou plasticard used sliced into 7mm planks for the interior bracing. The plank detail is scribes on both sides. Superglued construction, hopefully robust enough for a few years. I've since added top and bottom bolt detail. Colour will be brown.

The side doors can also be seen, but not started. These are also based on Garsten with a window in the top third split into three vertical panes. Think I'll scribe these, mask the window and then add the panes when it's all dry with the bow pen.

None of these will be working. One of the side doors will be closed, the other ajar, and the front ones will be fixed open, with Araldite, when they're finished.

Thursday 10 February 2011

Evolution to version 8 (well nearly 9...)

Well things evolve and it's worth sharing how a carpet based trainset morphs into a scenic garden line before any sod is cut, well I hope it's worth it!

The EJ&KLR was started at Christmas with basically Version 3 purchased - previous versions had been based on the siding track pack or second hand track purchases. Version 3 gave us a decent run, at least for indoors, but I had a desire to add a shed and stock storage area and the loop wasn't long enough so things stretched a little in January to Version 4.


However whilst track was purchased to get us to 4, the plans and ideas continued to evolve - taking the track plan of the station and shed area and building it into a more scenic garden setting.

This plan, the first of these garden based ideas (5) was designed to give a long run, and make use of existing shrubs as view blocks - however it was designed before the garden had been surveyed and was aspirational.

Interestingly, when I did measure up the proposed flower bed location I found it smaller than I imagined, or at least the LGB turned out bigger than I thought. The existing trees and stumps were thought best treated as datum 'immovable objects' hence why the line tries to weave around these in plans 6-9.


Starting with 6 it was obvious that I had taken some aspect of 5 and shoe-horned it in without thinking about the flow of the line. I was unhappy with the geometric feel and thought it looked too much like a big trainset, not helped by exclusive use of R1 curves.

Trying to incorporate more flow led to 7, which also used R2 curves to give gentler more eye friendly curves at each end. However it still felt a little too perfect geometrically. This stayed as it was for some time before a conversation I'd had with Dad about transition curves popped into my head. Version 8 of the plan doesn't quite fit (notice the small track gap) but I figured this could be easily sorted with a short length of extra straight track (it's about 40mm), however I used the R2 on the ends of the straights to give a transition and less perfect layout and I was happy. It wasn't the world's largest or most operationally interesting lines, but would give a scenic run, and some continous running, whilst maintaining the station area along one edge for maintenance purposes.

However I was still not happy with the curves so tinkering continues - and as you can see in 9, by ditching the R1s, and mixing R3s as well things start to become much more natural. Will I find a balance between them? I don't know - the price of track is such that I need to find a comprimise I am happy with - and recognise that even if I build Version 8, it will only be the start of a lifetime of garden railways that can evolve as my tastes, experience and wallet develops!

Wednesday 9 February 2011

Inspiration in book form...

Since becoming more interested in G, LGB in particular, and being taken by the company's more Austrian prototypes I very recently bought this excellent title from the Middleton Press online store (www.middletonpress.co.uk).

Austrian Narrow Gauge (featuring steam in the Alps) by John Organ.

First impressions are good, lovely atmospheric photos, route plans, descriptions and some well written sections. Perhaps a little more on the rack railways than I would like but the title does a good job of covering the narrow gauge (both 760mm and 1m, steam, diesel and electric, old, closed, modern and preserved) lines across the country.

I look forward to a few quiet evenings, coffee, biscuit and my favourite arm chair!


Tuesday 8 February 2011

More custom transfers...

Although I've not aquired any further rolling stock I know what I intend to source and how I want it to end up... I want 3 generic Austrian looking olive green coaches, a couple of open wagons and possibly a second goods van. To ensure I've got a good stock of transfers for these reliveries I'm doing another sheet and here is the work in progress (below), which shows the evolution from my previous attempts.

Drawn in Photoshop (but could equally be done in Illustrator, in fact the next batch will be I expect as there would be some advantages as I learn how this all works!) using the DIN1451 font, I've taken inspiration from LGB models and the Hungarian coaches on the Welshpool and Llanfair.

Sunday 6 February 2011

Bags full of character...

Whilst snapping the shunter I also took a few photos of the shed to show how much atmosphere has been created by fitting the roof and windows. With a little interior detailing and finishing the roof and doors, she'll be ready for the line when construction starts next month.

Liliput Diesel Lok V3 shunter finished...

Well after a week on the workbench I think it's safe to announce the shunter is finished... At least for now.

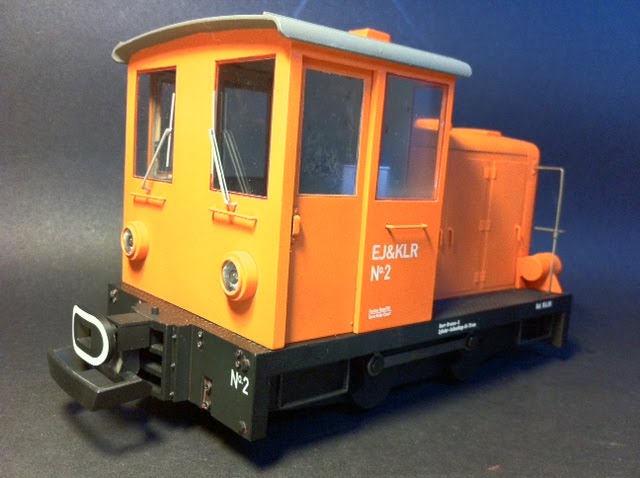
There is more I could do, like fit brake hoses, horns and add some soot around the stack, all jobs for the future.

To summarise this job it's had:
* foot boards and cut bars removed
* buffers and shanks fitted
* rivets removed from cab
* Davenport removed from hood
* new handrails fitted
* windscreen wipers made and fitted
* complete respray

Prototype for everything? Even LGB'isms?

Whilst browsing G-scale Central I came across this old thread relating to the LGB U-tank 0-6-2, a model of an Austrian prototype that goes back to the mid 1970s. Many versions have been produced over the years (mine is one of the last of the German made examples) but the model is about 1:22 in most dimensions. However the Stainz and starter set coaches are a little larger - closer to 1:20 - so the squat cab roof of the U-tank was altered by LGB on later models.

We think this was to match the other stock but perhaps there is a prototype for everything and LGB had seen this U-tank. I can't tell from the text where exactly it is but I believe the locomotive is preserved in Slovenia. It clearly has a taller cab that is much more in proportion to the LGB model! So perhaps all LGB are guilty of after all, is applying inconsistent liveries to the model rather than a gross alteration in the cab design!

Saturday 5 February 2011

Through the window...

It's progressing, the shed now is glazed! Not the worlds neatest finish but they look smart.

This one was the first, so is considerably rougher than the rest and since this was taken I've tidied it up a touch. They are cut from 3mm polystyrene I think, it's a material I bought from B&Q a long time ago for the garden shed glazing. Cut with a Stanley knife scored then snapped. The bars are painted on satin black using a bow pen and steel rule.

I don't know yet about window sills but whilst I'm pondering that I'll start on some doors next.

Shunter is 95% complete...

A few photos to show the model now it's been varnished all over and re-assembled. I'm a little annoyed about the satin varnish finish, it's not perfect but from normal viewing distances you can't see any blemishes.

The orange looks very bright and quite yellow in these shots but that's because they were taken under artificial light and the iPhone doesn't do a manual white point adjust!